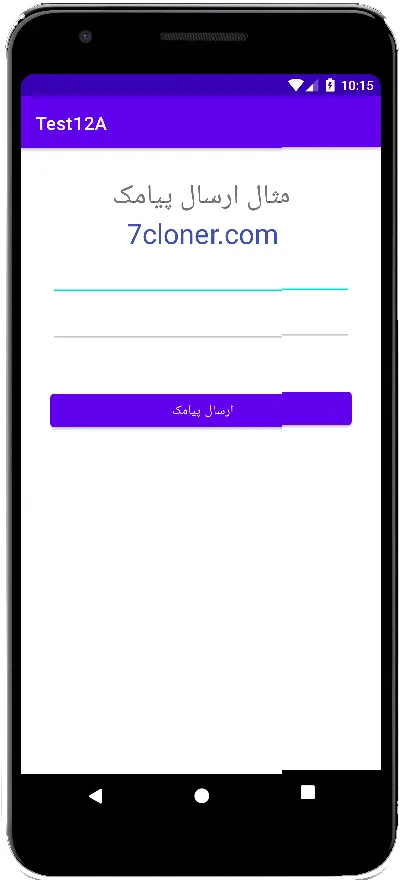
میتوانید با استفاده از یک API بنام SmsManager و یا برنامههای SMS داخلی نصب شده بر روی دستگاه, اقدام به ارسال پیامک در اندروید بکنید. در این آموزش دو مثال اساسی برای ارسال پیامک در اندروید را برای شما آورده ایم و برای ارسال مستقیم در انتهای این آموزش یک مثال کامل را بیان کرده ایم.
SmsManager API
SmsManager smsManager = SmsManager.getDefault();
smsManager.sendTextMessage("phoneNo", null, "sms message", null, null);
برنامه های داخلی ارسال SMS
Intent sendIntent = new Intent(Intent.ACTION_VIEW);
sendIntent.putExtra("sms_body", "default content");
sendIntent.setType("vnd.android-dir/mms-sms");
startActivity(sendIntent);
البته، هر دو به مجوز SEND_SMS نیاز دارند.
<uses-permission android:name="android.permission.SEND_SMS" />
به غیر از متدهای فوق، چند توابع مهم دیگر در کلاس SmsManager موجود است که این متدها در ادامه ذکر شده است :
| متد و توضیحات | ردیف |
|
ArrayList<String> divideMessage(String text) این متد یک متن پیام را به چند قسمت تقسیم می کند که هیچ کدام بزرگتر از حداکثر اندازه پیام اس ام اس نباشد و یک آرایه رشته ای از متن پیام برمیگرداند. |
1 |
|
static SmsManager getDefault() این متد برای دریافت نمونه پیش فرض SmsManager که قبلا درون سیستم نمونه سازی شده است, استفاده می شود. |
2 |
|
void sendDataMessage(String destinationAddress, String scAddress, short destinationPort, byte[] data, PendingIntent sentIntent, PendingIntent deliveryIntent) این متد برای ارسال پیامک مبتنی بر داده استفاده میشود که این داده ها را به یک پورت برنامه خاص ارسال میکند. |
3 |
|
void sendMultipartTextMessage(String destinationAddress, String scAddress, ArrayList<String> parts, ArrayList<PendingIntent> sentIntents, ArrayList<PendingIntent> deliveryIntents) این متد برای ارسال پیامک های بزرگ استفاده میشود و متن پیام بلند را بصورت چند قسمتی در قالب یک پیامک ارسال میکند. |
4 |
|
void sendTextMessage(String destinationAddress, String scAddress, String text, PendingIntent sentIntent, PendingIntent deliveryIntent) یک متن دریافت میکند و پیامک ساده ارسال کنید. |
5 |
مثال
مثال زیر بطور عملی به شما نشان می دهد که چگونه از شی SmsManager برای ارسال پیامک به شماره موبایل داده شده, استفاده کنید.
| مراحل و توضیحات | ردیف |
| در AndroidStudio یک پروژه جدید با پکیج نیم جدید ایجاد کنید و مراحل زیر را دنبال کنید. | 1 |
| کدهای درون فایل MainActivity.class را مطابق کدهای که در پایین وجود دارد تغییر بدهید. | 2 |
| کدهای درون فایل activity_main.xml را مطابق کدهای که در پایین وجود دارد تغییر بدهید. | 3 |
| مجوزهای لازم را در بالا آورده ایم آنها را بررسی و در فایل AndroidManifest.xml اضافه کنید. | 4 |
| برنامه را بر روی یک تلفن واقعی اجرا کنید و تست را انجام بدهید. | 5 |
کدهای فایل MainActivity.java
package com.example.test12a;

import androidx.annotation.NonNull;
import androidx.appcompat.app.AppCompatActivity;
import androidx.appcompat.widget.AppCompatEditText;
import androidx.core.app.ActivityCompat;
import androidx.core.content.ContextCompat;
import android.Manifest;
import android.content.pm.PackageManager;
import android.os.Bundle;
import android.telephony.SmsManager;
import android.widget.Toast;
import java.util.Objects;

public class MainActivity extends AppCompatActivity {

    private static final int MY_PERMISSIONS_REQUEST_SEND_SMS = 0;
    AppCompatEditText txtPhoneNo, txtMessage;
    String phoneNo, message;

    @Override
    protected void onCreate(Bundle savedInstanceState) {
        super.onCreate(savedInstanceState);
        setContentView(R.layout.activity_main);

        txtPhoneNo = findViewById(R.id.editText);
        txtMessage = findViewById(R.id.editText2);

        findViewById(R.id.btnSendSMS).setOnClickListener(view -> sendSMSMessage());
    }

    protected void sendSMSMessage() {
        phoneNo = Objects.requireNonNull(txtPhoneNo.getText()).toString();
        message = Objects.requireNonNull(txtMessage.getText()).toString();

        if (ContextCompat.checkSelfPermission(this, Manifest.permission.SEND_SMS) != PackageManager.PERMISSION_GRANTED) {
            if (!ActivityCompat.shouldShowRequestPermissionRationale(this, Manifest.permission.SEND_SMS)) {
                ActivityCompat.requestPermissions(this,
                        new String[]{Manifest.permission.SEND_SMS},
                        MY_PERMISSIONS_REQUEST_SEND_SMS);
            }
        }
    }

    @Override
    public void onRequestPermissionsResult(int requestCode, @NonNull String[] permissions, @NonNull int[] grantResults) {
        super.onRequestPermissionsResult(requestCode, permissions, grantResults);
        if (requestCode == MY_PERMISSIONS_REQUEST_SEND_SMS) {
            if (grantResults.length > 0
                    && grantResults[0] == PackageManager.PERMISSION_GRANTED) {
                SmsManager smsManager = SmsManager.getDefault();
                smsManager.sendTextMessage(phoneNo, null, message, null, null);
                Toast.makeText(getApplicationContext(), "پیام ارسال شد.",
                        Toast.LENGTH_LONG).show();
            } else {
                Toast.makeText(getApplicationContext(),
                        "خطا در ارسال پیامک, مجدد امتحان کنید.", Toast.LENGTH_LONG).show();
            }
        }

    }

}
کدهای فایل activity_main.xml
<?xml version="1.0" encoding="utf-8"?>
<RelativeLayout xmlns:android="http://schemas.android.com/apk/res/android"
    xmlns:tools="http://schemas.android.com/tools"
    android:layout_width="match_parent"
    android:layout_height="match_parent"
    android:padding="32dp"
    tools:context="MainActivity">

    <TextView
        android:id="@+id/textView1"
        android:layout_width="wrap_content"
        android:layout_height="wrap_content"
        android:layout_alignParentTop="true"
        android:layout_centerHorizontal="true"
        android:text="مثال ارسال پیامک"
        android:textSize="30sp" />

    <TextView
        android:id="@+id/textView2"
        android:layout_width="match_parent"
        android:layout_height="wrap_content"
        android:layout_below="@+id/textView1"
        android:gravity="center"
        android:text="7cloner.com"
        android:textColor="#3F51B5"
        android:textSize="30sp" />


    <androidx.appcompat.widget.AppCompatEditText
        android:id="@+id/editText"
        android:layout_width="match_parent"
        android:layout_height="50dp"
        android:layout_below="@+id/textView2"
        android:layout_centerHorizontal="true"
        android:hint="شماره تماس را وارد کنید"
        android:inputType="phone"
        android:textColorHint="@color/abc_primary_text_material_dark" />

    <androidx.appcompat.widget.AppCompatEditText
        android:id="@+id/editText2"
        android:layout_width="match_parent"
        android:layout_height="50dp"
        android:layout_below="@+id/editText"
        android:hint="متن پیام را وارد کنید"
        android:textColorHint="@color/abc_primary_text_material_dark" />

    <Button
        android:id="@+id/btnSendSMS"
        android:layout_width="match_parent"
        android:layout_height="wrap_content"
        android:layout_below="@+id/editText2"
        android:layout_centerHorizontal="true"
        android:layout_marginTop="48dp"
        android:text="ارسال پیامک" />

</RelativeLayout>
فایل AndroidManifest.xml
<?xml version="1.0" encoding="utf-8"?>
<manifest xmlns:android="http://schemas.android.com/apk/res/android"
    xmlns:tools="http://schemas.android.com/tools"
    package="com.example.test12a" >

    <uses-permission android:name="android.permission.SEND_SMS"/>

    <application
        android:allowBackup="true"
        android:dataExtractionRules="@xml/data_extraction_rules"
        android:fullBackupContent="@xml/backup_rules"
        android:icon="@mipmap/ic_launcher"
        android:label="@string/app_name"
        android:roundIcon="@mipmap/ic_launcher_round"
        android:supportsRtl="true"
        android:theme="@style/Theme.Test12A"
        tools:targetApi="31" >

        <activity
            android:name=".MainActivity"
            android:exported="true" >
            <intent-filter>
                <action android:name="android.intent.action.MAIN" />

                <category android:name="android.intent.category.LAUNCHER" />
            </intent-filter>
        </activity>
    </application>

</manifest>
به این نکته توجه کنید که این مثال بر روی تلفن های واقعی قابل تست میباشد. سرآخر بعد از اجرای پروژه میتوانید آنرا تست کنید و نتیجه به این صورت خواهد بود:


