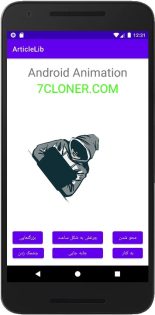
طراحی و اجرای انیمیشن ها در اندروید از طریق راه های مختلفی امکان پذیر است. در این مقاله به تمامی این راه ها می پردازیم و اشکال مختلفی از آن را ایجاد میکنیم.
انیمیشن Tween
به این ترتیب برای اجرا انیمیشن در اندروید, ما یک تابع استاتیک loadAnimation() از کلاس AnimationUtils را فراخوانی می کنیم. با استفاده از این روش ما می خواهیم که نتیجه را بعنوان یک آبجکت Animation دریافت کنیم. به شکل زیر :
Animation animation = AnimationUtils.loadAnimation(getApplicationContext(), R.anim.myanimation);
به پارامتر دوم توجه کنید. این پارامتر دوم نام فایل xml انیمیشن ما می باشد. شما باید یک پوشه جدید به نام anim در پوشه res ایجاد کنید و یک فایل xml با نام دلخواه در این پوشه بسازید. این کلاس انیمیشن دارای بسیاری از توابع مفید است که در پایین لیست شده است.
| تابع و توضیحات آن | ردیف |
| start()
این متد انیمیشن ایجاد شده را اجرا میکند. |
1 |
| setDuration(long duration)
با استفاده از این متد میتوانید مدت زمانی که باید انیمیشن اجرا را تنظیم کنید. |
2 |
| getDuration()
با استفاده از این متد می توانید مدت زمانی که باید انیمیشن اجرا شود را دریافت کنید. |
3 |
| end()
این متد به انیمیشن پایان می دهد.
|
4 |
| cancel()
این متد انیمیشن را لغو می کند.
|
5 |
ImageView image1 = (ImageView)findViewById(R.id.imageView1);
image.startAnimation(animation);
مثال
| توضیحات | مراحل |
| با استفاده از محیط اندروید استودیو یک پروژه جدید ایجاد کنید. | 1 |
| کد های موجود در فایل MainActivity.java را بر اساس کد های که در پایین آوردیم تغییر دهید. | 2 |
| کد های موجود در فایل activity_main.xml را بر اساس کد های که در پایین آوردیم تغییر دهید تا ویو های ضروری در صفحه اضافه شود. | 3 |
| یک پوشه با نام anim در پوشه res ایجاد کنید. | 4 |
|
روی anim راست کلیک کنید و روی new بزنید. آیتم Animation resource file را انتخاب کنید باید فایل های مختلفی بسازید که در زیر لیست شده اند.
|
5 |
| فایل های myanimation.xml, clockwise.xml, fade.xml, move.xml, blink.xml, slide.xml را ایجاد کنید و کد XML های که در پایین آوردیم را اضافه به آنها اضافه کنید. | 6 |
|
نیازی به تغییر ثابت های string پیش فرض نیست. اندروید استودیو از ثابت های پیش فرض در values/string.xml مراقبت می کند.
|
7 |
| یک تلفن را انتخاب کنید, پروژه را روی آن اجرا کنید و نتایج آن را بررسی کنید. | 8 |
کدهای فایل MainActivity.class :
package com.foray.articlelib;

import android.os.Bundle;
import android.view.View;
import android.view.animation.Animation;
import android.view.animation.AnimationUtils;
import android.widget.ImageView;

import androidx.appcompat.app.AppCompatActivity;

public class MainActivity extends AppCompatActivity {
    @Override
    protected void onCreate(Bundle savedInstanceState) {
        super.onCreate(savedInstanceState);
        setContentView(R.layout.activity_main);
    }

    public void clockwise(View view){
        ImageView image = (ImageView)findViewById(R.id.imageView);
        Animation animation = AnimationUtils.loadAnimation(getApplicationContext(),
                R.anim.myanimation);
        image.startAnimation(animation);
    }

    public void zoom(View view){
        ImageView image = (ImageView)findViewById(R.id.imageView);
        Animation animation1 = AnimationUtils.loadAnimation(getApplicationContext(),
                R.anim.clockwise);
        image.startAnimation(animation1);
    }

    public void fade(View view){
        ImageView image = (ImageView)findViewById(R.id.imageView);
        Animation animation1 =
                AnimationUtils.loadAnimation(getApplicationContext(),
                        R.anim.fade);
        image.startAnimation(animation1);
    }

    public void blink(View view){
        ImageView image = (ImageView)findViewById(R.id.imageView);
        Animation animation1 =
                AnimationUtils.loadAnimation(getApplicationContext(),
                        R.anim.blink);
        image.startAnimation(animation1);
    }

    public void move(View view){
        ImageView image = (ImageView)findViewById(R.id.imageView);
        Animation animation1 =
                AnimationUtils.loadAnimation(getApplicationContext(), R.anim.move);
        image.startAnimation(animation1);
    }

    public void slide(View view){
        ImageView image = (ImageView)findViewById(R.id.imageView);
        Animation animation1 =
                AnimationUtils.loadAnimation(getApplicationContext(), R.anim.slide);
        image.startAnimation(animation1);
    }
}
کدهای فایل activity_main.xml :
<RelativeLayout xmlns:android="http://schemas.android.com/apk/res/android"
    xmlns:tools="http://schemas.android.com/tools"
    android:layout_width="match_parent"
    android:layout_height="match_parent"
    android:padding="16dp"
    tools:context=".MainActivity">

    <TextView
        android:id="@+id/textView"
        android:layout_width="wrap_content"
        android:layout_height="wrap_content"
        android:layout_alignParentTop="true"
        android:layout_centerHorizontal="true"
        android:text="Android Animation"
        android:textSize="35dp" />

    <TextView
        android:id="@+id/textView2"
        android:layout_width="wrap_content"
        android:layout_height="wrap_content"
        android:layout_below="@+id/textView"
        android:layout_centerHorizontal="true"
        android:text="7CLONER.COM"
        android:textColor="#ff3eff0f"
        android:textSize="35dp" />

    <ImageView
        android:id="@+id/imageView"
        android:layout_width="wrap_content"
        android:layout_height="wrap_content"
        android:layout_below="@+id/textView2"
        android:layout_alignStart="@+id/textView"
        android:layout_alignLeft="@+id/textView"
        android:layout_alignEnd="@+id/textView2"
        android:layout_alignRight="@+id/textView2"
        android:src="@drawable/abc" />

    <Button
        android:id="@+id/button"
        android:layout_width="wrap_content"
        android:layout_height="wrap_content"
        android:layout_below="@+id/imageView"
        android:layout_alignParentStart="true"
        android:layout_alignParentLeft="true"
        android:layout_marginTop="40dp"
        android:onClick="clockwise"
        android:text="بزرگنمایی" />

    <Button
        android:id="@+id/button2"
        android:layout_width="wrap_content"
        android:layout_height="wrap_content"
        android:layout_alignTop="@+id/button"
        android:layout_centerHorizontal="true"
        android:onClick="zoom"
        android:text="چرغش به شکل ساعت" />

    <Button
        android:id="@+id/button3"
        android:layout_width="wrap_content"
        android:layout_height="wrap_content"
        android:layout_alignTop="@+id/button2"
        android:layout_alignParentEnd="true"
        android:layout_alignParentRight="true"
        android:onClick="fade"
        android:text="محو شدن" />

    <Button
        android:id="@+id/button4"
        android:layout_width="wrap_content"
        android:layout_height="wrap_content"
        android:layout_below="@+id/button"
        android:layout_alignParentStart="true"
        android:layout_alignParentLeft="true"
        android:onClick="blink"
        android:text="چشمک زدن" />

    <Button
        android:id="@+id/button5"
        android:layout_width="wrap_content"
        android:layout_height="wrap_content"
        android:layout_below="@+id/button2"
        android:layout_alignStart="@+id/button2"
        android:layout_alignLeft="@+id/button2"
        android:layout_alignEnd="@+id/button2"
        android:layout_alignRight="@+id/button2"
        android:onClick="move"
        android:text="جابه جایی" />

    <Button
        android:id="@+id/button6"
        android:layout_width="wrap_content"
        android:layout_height="wrap_content"
        android:layout_below="@+id/button3"
        android:layout_alignParentEnd="true"
        android:layout_alignParentRight="true"
        android:onClick="slide"
        android:text="به کنار" />


</RelativeLayout>
کدهای فایل myanimation.xml :
<?xml version="1.0" encoding="utf-8"?>
<set xmlns:android="http://schemas.android.com/apk/res/android">

    <scale xmlns:android="http://schemas.android.com/apk/res/android"
        android:fromXScale="0.5"
        android:toXScale="3.0"
        android:fromYScale="0.5"
        android:toYScale="3.0"
        android:duration="5000"
        android:pivotX="50%"
        android:pivotY="50%" >
    </scale>

    <scale xmlns:android="http://schemas.android.com/apk/res/android"
        android:startOffset="5000"
        android:fromXScale="3.0"
        android:toXScale="0.5"
        android:fromYScale="3.0"
        android:toYScale="0.5"
        android:duration="5000"
        android:pivotX="50%"
        android:pivotY="50%" >
    </scale>

</set>
کدهای فایل clockwise.xml :
<?xml version="1.0" encoding="utf-8"?>
<set xmlns:android="http://schemas.android.com/apk/res/android">

    <rotate xmlns:android="http://schemas.android.com/apk/res/android"
        android:fromDegrees="0"
        android:toDegrees="360"
        android:pivotX="50%"
        android:pivotY="50%"
        android:duration="5000" >
    </rotate>

    <rotate xmlns:android="http://schemas.android.com/apk/res/android"
        android:startOffset="5000"
        android:fromDegrees="360"
        android:toDegrees="0"
        android:pivotX="50%"
        android:pivotY="50%"
        android:duration="5000" >
    </rotate>

</set>
کدهای فایل fade.xml :
<?xml version="1.0" encoding="utf-8"?>
<set xmlns:android="http://schemas.android.com/apk/res/android"
    android:interpolator="@android:anim/accelerate_interpolator" >

    <alpha
        android:fromAlpha="0"
        android:toAlpha="1"
        android:duration="2000" >
    </alpha>

    <alpha
        android:startOffset="2000"
        android:fromAlpha="1"
        android:toAlpha="0"
        android:duration="2000" >
    </alpha>

</set>
کدهای فایل move.xml :
<?xml version="1.0" encoding="utf-8"?>
<set
    xmlns:android="http://schemas.android.com/apk/res/android"
    android:interpolator="@android:anim/linear_interpolator"
    android:fillAfter="true">

    <translate
        android:fromXDelta="0%p"
        android:toXDelta="75%p"
        android:duration="800" />
</set>
کدهای فایل blink.xml :
<?xml version="1.0" encoding="utf-8"?>
<set xmlns:android="http://schemas.android.com/apk/res/android">
    <alpha android:fromAlpha="0.0"
        android:toAlpha="1.0"
        android:interpolator="@android:anim/accelerate_interpolator"
        android:duration="600"
        android:repeatMode="reverse"
        android:repeatCount="infinite"/>
</set>
کدهای فایل slide.xml :
<?xml version="1.0" encoding="utf-8"?>
<set xmlns:android="http://schemas.android.com/apk/res/android"
    android:fillAfter="true" >

    <scale
        android:duration="500"
        android:fromXScale="1.0"
        android:fromYScale="1.0"
        android:interpolator="@android:anim/linear_interpolator"
        android:toXScale="1.0"
        android:toYScale="0.0" />
</set>


